Published on July 6, 2026
Design Menu - VibeDesign Feature
The new version introduces the Design menu group with a revolutionary feature: VibeDesign. Learn how to design family houses simply and quickly with cadR.
Design Menu
The new version introduces a new menu group called Design. This is a brand new development - essentially a "VibeDesign" solution.
What is "VibeDesign"?
If we interpret it literally, it's a chat window where you outline what plans you need, press enter, and the program starts fulfilling your request. Yes, the development started with this concept. To my surprise, based on my research online and my inquiries to AI, users prefer to get involved in the design process themselves rather than typing in their justified objections when they receive a ready-made solution.
Design Menu Structure
Clicking on Design reveals a comprehensive menu system that covers the design of almost all types of buildings. Don't be intimidated - currently only the Family house within the Residential type is functional. However, it looks promising for the future, with many tasks still awaiting us.
Family House Design
Clicking on Family house displays a Floorplan tab next to the Layout1 tab, along with the FloorplaneDesigner panel. Immediately, you'll see a floor plan sketch for a family house. It's worth starting your exploration by clicking through the tabs at the top of the panel. These are straightforward - clicking the Floorplan tab displays the floor plan generated from the sketch.
3D Model Generation
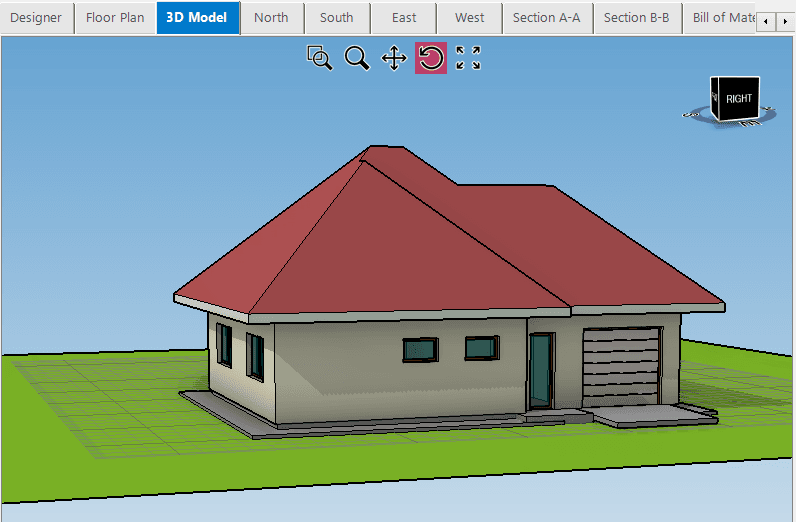
Clicking the 3D Model tab generates a 3D model based on the floor plan sketch. This 3D model is a true BuildingPatterns descendant. This means that beyond rotating and zooming, it can do a few interesting things. The main attraction is the PropertyPopupMenu. This pops up when you right-click on any building structural element. I won't explain this much, as its usefulness is self-evident.
There are structural units in the model that follow certain patterns. Examples include the roof shape or the slab spacing. The cursor changes to a pointing finger over these, indicating that you can switch patterns by pressing space. For example, the roof shape can be Flat, Pitch, or Mansard. This can be controlled in the PropertyPopupMenu's ShapeOf property, or there's the quick method of pressing space.
Additional Views
The following tabs show the 4 elevations and 2 sections, with the last one showing the bill of materials.
FloorplaneDesigner Panel Controls
At the top of the FloorplaneDesigner panel are the panel control buttons. Clicking Chat displays a selection list with room names. Click on these, and the selected room is added to the collection below. Clicking OK clears the floor plan sketch and displays the rooms in your collection with a basic arrangement. By this, we mean there are characteristic room groups - for example, the entrance room group, living room group, bedroom group, etc. - and it creates a simple arrangement based on these.
With the editing options, you can transform this simple arrangement into any optimal layout. You can place your doors and windows, demonstrate the envisioned furniture arrangement.
Toolbar Buttons
The use of New, Open, and Save is self-explanatory.
Arrange is useful when you just throw rooms onto the editing surface and need a basic arrangement.
Generating Plans
The Design To Modelspace button initiates the generation of plans. It displays a progress indicator that informs you about the plan creation status. Green bars run until the plans are completed. This takes approximately 1 minute.
Payment Process
The completed plans appear on the cadR Model panel with an informational message stating that using the plans is subject to payment, and you can either pay a few dollars or discard the completed plans. If you choose payment, it displays the cadR website where you can pay the fee. After successful payment, the plan is freely accessible: it can be saved, printed, and further edited.
Printing
The plans can be printed immediately. Place a PrintFrame element on the drawing surface so that, for example, its upper left corner is outside the drawing frame's upper left corner. Then drag the grip point at the opposite corner outside the drawing frame's lower right corner. Finally, right-click on the PrintFrame and select Preview.